What autogenous block grafting is, and why it’s used
A solid block of the patient’s own bone is harvested from a second surgical site and fixed onto a deficient ridge to rebuild width and/or height before implant placement.
It’s indicated where the alveolar ridge is too thin or too short – horizontally, vertically, or both – to place an implant in a prosthetically correct position, and where the defect is too large or too shaped for particulategraft and membrane (guided bone regeneration) alone to reliably restore.
Because it’s the patient’s own living bone, it remains the reference standard for volume and predictability of gain, at the cost of a second operative site.
The procedure, start to finish
Planning
CBCT imaging of both the recipient defect and the chosen donor site to confirm adequate bone volume and map vital structures (mental foramen/nerve, inferior alveolar canal, tooth roots).
Recipient site preparation
A mucoperiosteal flap is raised over the deficient ridge, the site debrided, and the recipient bone perforated (decortication) to encourage blood supply and healing into the graft.
Donor site access
A separate intraoral flap is raised at the symphysis or ramus. The outline of the block is marked and cut with a fine saw or piezoelectric instrument to a controlled, shallow depth.
Block harvest
The block is carefully levered free with osteotomes, preserving as much cortex and attached cancellous bone as possible, then placed in sterile saline.
Donor site closure
The donor site is smoothed, haemostasis achieved, sometimes packed with collagen or residual bone chips, and closed in layers (this heals independently of the graft site).
Shaping and fixation
The block is contoured to fit the recipient ridge and rigidly fixed with one or more titanium bone screws (occasionally plates), keeping it in close contact with the underlying bone.
Gap filling & coverage
Any residual gaps around the block are often packed with particulate bone graft, and a resorbable membrane may be placed over the construct.
Tension-free closure
The recipient flap is released and closed without tension over the graft – this is critical, as exposure is the main cause of graft failure.
Healing period
Typically 4–6 months of undisturbed healing while the block revascularises and integrates with the native ridge.
Re-entry & implant placement
The site is reopened, fixation screws removed, graft integration confirmed, and the dental implant(s) placed – either at this visit or, if more maturation is needed, at a later stage.
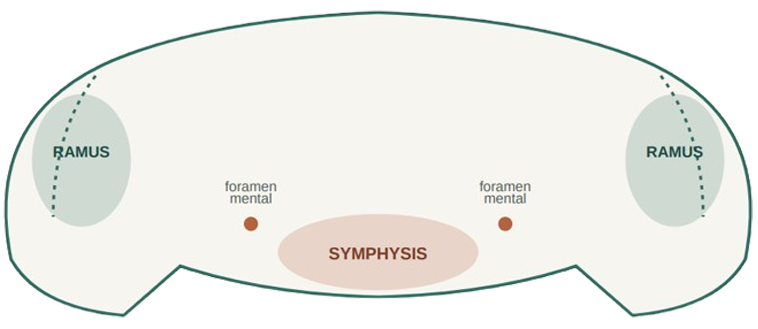
Schematic — lower jaw, front view. Shaded zones show the two common donor areas: the symphysis (chin, between the mental foramina) and the ramus (back corner of the jaw, both sides). Dots mark the mental nerve exit points, the key structure to protect when harvesting from the symphysis. This is a simplified diagram for orientation, not an anatomical or clinical reference image.
Donor site: symphysis vs ramus
Both are intraoral sites accessed without any skin incision. The choice depends mainly on how much bone is needed and where the recipient defect is.
CHIN
Symphysis
BONE YIELDLarger volume, good mix of cortical and cancellous bone.
BEST SUITED FORLarger defects, anterior maxilla, cases needing more height as well as width.
KEY STRUCTURES AT RISK- Mental nerve (branches) & incisive nerve – altered lip/chin/gum sensation
- Anterior tooth roots – must stay well below the apices
- Mentalis muscle – needs precise resuturing to avoid chin droop (ptosis)
- More swelling and bruising of the chin/lower lip
- Higher rate of transient (occasionally permanent) numbness in the chin/lip/lower front teeth
- Generally more post-operative discomfort than ramus
BACK OF JAW
Ramus
BONE YIELDSmaller volume, predominantly dense cortical bone.
BEST SUITED FORLocalised, moderate width defects – commonly posterior mandible or premolar/canine region.
KEY STRUCTURES AT RISK- Inferior alveolar nerve (IAN), running close beneath the harvest site
- Lingual nerve, at risk if retraction/dissection strays lingually
- Generally less swelling and discomfort than symphysis
- Lower rate of sensory disturbance overall, though numbness of lip/chin can still occur if the IAN is irritated
- Mild restriction in mouth opening (trismus) for a few days is common
In short
Choose symphysis when a larger, thicker block is needed and some added donor-site sensitivity risk is acceptable.
Choose ramus when the defect is more modest, and lower donor-site morbidity is the priority.
Both sites carry a genuine, non-trivial risk of temporary – and a small risk of permanent – altered sensation, which must be discussed explicitly with the patient beforehand.
Autogenous block vs synthetic and xenograft alternatives
Autogenous bone is the only material that is osteogenic (contains living bone-forming cells), as well as osteoinductive and osteoconductive. Every alternative below lacks the osteogenic property, which is the main reason autogenous block remains the benchmark for larger, shape-critical defects.
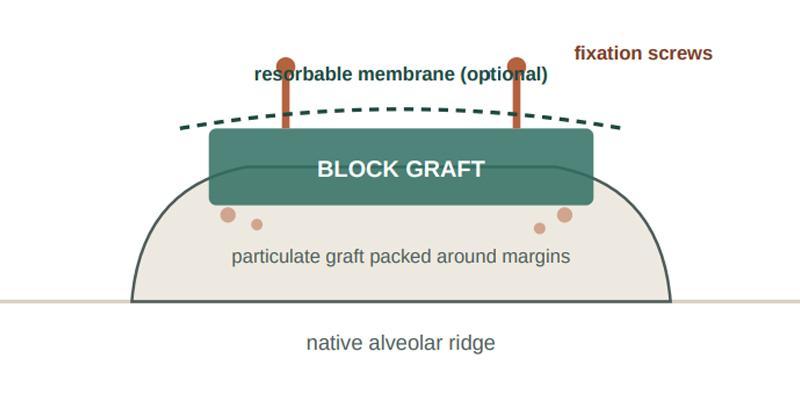
Schematic – cross-section of a fixed block graft. The block is screwed to the recipient ridge, gaps packed with particulate graft, and sometimes covered with a membrane before tension-free soft tissue closure.
| MATERIAL | REGENERATIVE PROPERTIES | DONOR SITE | PREDICTABILITY FOR LARGE/SHAPECRITICAL DEFECTS | OTHER CONSIDERATIONS |
|---|---|---|---|---|
| Autogenous block (symphysis/ramus) + | Osteogenic + osteoinductive + osteoconductive | Yes – second surgical site, added morbidity | Highest – gold standard | Limited volume available; longer surgery; best long-term volume stability |
| Xenograft (e.g. bovine-derived) + | Osteoconductive only | None | Lower as a stand-alone block; more predictable as particulate + membrane for smaller defects | Very slow resorption (good for long-term volume maintenance); unlimited supply; some patients decline for religious/ethical/dietary reasons; theoretical (very low) disease transmission risk |
| Allograft (processed human donor bone) + | Osteoconductive, some osteoinductive if demineralised | None | Moderate – generally used as particulate rather than load-bearing block | No donor site; very low but non-zero disease transmission risk; some patients decline on ethical/religious grounds |
| Synthetic / alloplast (e.g. beta-TCP, hydroxyapatite) + | Osteoconductive only | None | Lowest for large defects alone; often combined with autogenous chips or growth factors | No biological/disease risk; unlimited, consistent supply; weakest regenerative capacity of the group; resorption/remodelling rate varies by material |
Why choose autogenous over the alternatives
- Only material with true bone-forming (osteogenic) cells → most reliable new bone formation
- Best evidence base for predictable volume gain in significant horizontal/vertical defects
- No disease-transmission risk and no ethical/religious objection, since it’s the patient’s own tissue
- Structural block form holds its shape well under the soft tissue during healing
Why choose an alternative instead
- No second surgical site – avoids donor-site pain, swelling, and nerve risk entirely
- Shorter operating time and generally lower overall patient morbidity
- Unlimited material – not constrained by how much bone the patient has to give
- Often sufficient, and preferred, for smaller or less shape-critical defects, especially combined with guided bone regeneration
Risks and complications
General to the grafting procedure
Graft failure / partial resorption
The block may partially or, rarely, completely fail to integrate – most often linked to soft tissue exposure/infection during healing.
Wound dehiscence / graft exposure
If the recipient site flap opens, the graft can become exposed to the mouth, raising infection and failure risk.
Infection
At either the donor or recipient site; usually manageable but can compromise graft take
Swelling, bruising, discomfort
Expected after any bone surgery; typically peaks at 2-3 days and settles over 1-2 weeks.
Donor-site specific
Altered sensation (symphysis)
Temporary – and occasionally permanent – numbness or altered feeling in the chin, lower lip, or lower front teeth from mental/incisive nerve disturbance.
Altered sensation (ramus)
Numbness of the lower lip/chin if the inferior alveolar nerve is irritated; generally less frequent than with symphysis harvest.
Chin contour change
Rare chin ptosis (drooping) if the mentalis muscle isn’t precisely resutured at a symphysis donor site.
Damage to adjacent tooth roots
A small risk at the symphysis if the harvest extends too close to the apices of the lower front teeth.
Restricted mouth opening (trismus)
More common after ramus harvest; usually temporary.
How risk is reduced
- Careful CBCT planning to map nerve position and tooth root apices before cutting
- Conservative, controlled osteotomy depth and use of piezoelectric instruments where available to protect soft tissue and nerves
- Meticulous, tension-free closure at both sites
- Antibiotic cover and strict oral hygiene instructions through healing
- Early review to catch and manage any exposure or infection promptly
Talking it through with your patient
What we’re doing
Your jawbone doesn’t have enough width or height in one area to support a dental implant safely and in the right position. We’re going to take a small block of bone from another part of your own jaw – either your chin or the back corner of your jaw – and fix it onto the area that needs building up.
Why we’re using your own bone rather than a synthetic or animal-derived graft
Your own bone gives the most reliable and predictable result for a defect of this size and shape, because it contains living cells that actively help form new bone – something artificial or donor materials can’t fully replicate. The trade-off is a second small surgical site.
Where the bone is coming from
We’ve recommended [symphysis / ramus] because [it gives enough bone for the size of area we need to rebuild / it’s a smaller, more localised area to fix and this keeps the second surgery site as minor as possible].
Main risks to be aware of
Swelling, bruising and discomfort at both sites for one to two weeks.
A real possibility of temporary numbness in your chin, lip, or teeth near the donor site – occasionally this doesn’t fully recover.
A small risk the graft doesn’t take as well as hoped and needs further treatment.
What happens after
Both sites heal over the following weeks. The graft itself needs around four to six months to properly join with your own bone before we can safely place the implant.
Your alternatives
We could use a synthetic or donor/animal-derived bone graft instead, which avoids a second surgical site but generally isn’t as predictable for building up an area of this size – and may mean a less certain final result. We can discuss whether that trade-off makes sense for you.